Hello and Welcome,
There is so much that is good on this Trek 330 I am having trouble calling it a restoration. So I`ll just call it "making it road ready" plus an intense detail job.
Above: As I mentioned on the last post "Assessing the Trek 330 for Restoration" I wanted to clean-up the brake lever hoods right away. If I am going to have to replace these hoods or hoods and levers I want to know that right away. As you can see the hoods cleaned up pretty good and this is after one quick cleaning. This is good news, as I really like the look of the original hoods.
Above: Here I have finished cleaning the multi speed chain. I ran it through the chain cleaner with Park citrus cleaner. Afterwards I rinsed out the cleaner and repeated the process. This is a nice chain and I suspect it was part of the last overhaul as it is in beautiful condition. I had also begun to clean up the 6 speed free wheel (rear sprocket group) and the rear derailleur using White Lightning Clean Streak along with my park brushes and some paper towels.
Above: I originally purchased these Origin 8 road sport pedals with toe clips for the upcoming Fuji Gran Tourer SE. But this style pedal looked so good on the red and white Centurion I have decided to use them on this bike instead. I`ll worry about the Fuji latter. At this point I will have to remove them to work on the crank. I just wanted to see how they looked on the bike.
Above: Now that I know the hoods and levers are good I can clean up the bars and stem for re-taping. The cable housings look fine so I will reuse them after cleaning and lubricating them before installing the new Jag Wire brake cables. To remove the adhesive tape residue I sped up the process by using a fine brass wheel brush (Wear Safety Glasses) on the 18 volt rechargeable drill / driver. It was dusty so I set up a fan to blow the debris out the overhead door while I was doing this. I use the fan quite often when doing the dusty work.
Above: The front wheel (rim) and hub cleaned up really well using only Mother's Mag and Aluminum Polish. At this point I had not yet removed the tires to inspect the tubes and remount them with the valve stems centered to the tags or labels. I may have used a fine brass detail brush around a few of the spoke nipples. But that was the full extent of any brushing I did on the front wheel. (a nice change of pace)
Above: Just to the left of the T (in Trek) I did a paint scratch touch up. I wish all my paint touch ups were this invisible. And I am using a red enamel nail polish to touch up the paint. Nail polish is great for red as it comes in about 100 different shades. My wife has a really good eye for matching colors. And she nailed it on this one!
Above: The rear wheel, spokes and hub all cleaned up. I noticed "wheel marks" after cleaning, which I do not normally see using a fine brass wheel brush. At least I thought I had used a fine "brass" wheel brush?????. Please be careful when purchasing brass brushes. And here is why. I think what I actually purchased were "brass plated" wire brushes. Not the same thing. After examining the paper part of the package "which is clear by the way" I noticed it does not actually say brass brush. It says wire wheel brush. This way "technically" they are not ripping you off. Although when you look at the package you see what appears "for all intents and purposes" to be a brass brush. Looks like the infamous "they" have just figured a new way to rip us off. So Buyer Beware! The spokes were cleaned with Armor All cleaning wipes. After that many of the spokes were also lightly sanded with fine 420 automotive grade wet sandpaper. And the outer hub was polished with Mothers. The hub flanges were cleaned up with Armor All cleaning wipes and touched up with a "real brass" detail brush.
Above: I did end up removing the rear derailleur for a proper de greasing and cleaning. I also serviced the hub and cleaned up the free wheel a little better. And I lubricated the free wheel mechanism. I do this by spinning the free wheel by hand (free-wheel facing upwards) and adding a few drops of oil into the gap where the sprocket group spins on the axis of the free wheel unit. Then spin until you feel or hear that the oil has worked it`s may to the needle bearings. Then just wipe off the excess and your free wheel unit is good to go. And always lightly grease the threads prior to installing the free-wheel unit.
Above: The front derailleur all de greased, cleaned and polished. I did the front derailleur in place. It is working so perfectly right where it is. And it was not all that dirty to begin with. So why go looking for trouble? If you are having trouble with installing and adjusting your front derailleur, check out the Video Of The Week section in the right side column. I believe "Front Derailleur Adjustment" is right at the top of the list. There is also a video for "Rear Derailleur Adjustment". It takes a bit of practice to become proficient at derailleur adjustment "especially the front derailleur". So do not beat up on yourself if you are having trouble, everyone does at first. As always I did replace the derailleur cables with new Jag Wire shift cables. I lubed both derailleurs with a light spray of Tri Flo.
Above: If this saddle looks familiar, it should. I took it off the red lugged frame fixed gear bike. I went with a "leather like" Charge spoon saddle and some very cool ergo grips on the fixed gear. But we will talk about that latter. I think the saddle looks great on this bike. And it performs well too! As for the original micro adjust seat post, I basically polished it up with Mothers and cleaned up the top black parts with a Armor All cleaning wipe. I also put a very light coat of grease on the lower approximately 1/3 of the post before inserting it into the seat tube.
Above: A shot of the crank from the back side, it cleaned up beautifully. I love the shine of brand new cables. As always I used Mothers on the crank arms and chain rings. I have also started doing paint scratch repair around the bottom bracket shell.
Above: The crank from the drive side. I love it when the Shimano road Crankset Sticker (Bio-Pace) is unmolested because cleaned up the Crankset almost looks right off the shelf. I have not serviced the bottom bracket bearings and spindle yet. Only because they are super smooth. But I will do it eventually if for no other reason than just to prove to myself that they do not need it.
How neurotic is that? LTMS
Above: As for the road caliper brakes I did remove them for cleaning. And I also removed the newer shoes for inspection and cleaning. But I did not break the calipers down for cleaning. It just was not necessary. I did however give them a very good cleaning and of course a new set of Jag wire brake cables. And the shoes "are like new" and not hardened in the least. It is refreshing to work on a bike that was so well cared for.
Above: With the money I saved not having to buy new tires I purchased these beautiful Specialized composite water bottle cages. Now most of you know I do not weigh any parts or components. So I will just say they are very light weight in comparison to the originals.
And the colors fit in perfectly with my "mental picture" I had of this bike when finished.
Above: The savings also allowed me to spend a little more than usual on the handlebar tape.
This Specialized cork handlebar tape is Phat. I am very comfortable now with taping handlebars in the modern way now. I still use a razor blade to finish buy only to score the tape not cutting all the way through the tape. And I just finish the cut with a single edge razor. For me it works better than scissors. (but my scissors are crap)
Above: I was not sure if I would like these pedals for myself as I have sort of wide feet.
But it turned out they are very comfortable and I will keep these pedals on the bike if I keep or sell it. They were inexpensive although I do not remember the exact price. I do remember that they are Origin 8 road sport pedals.
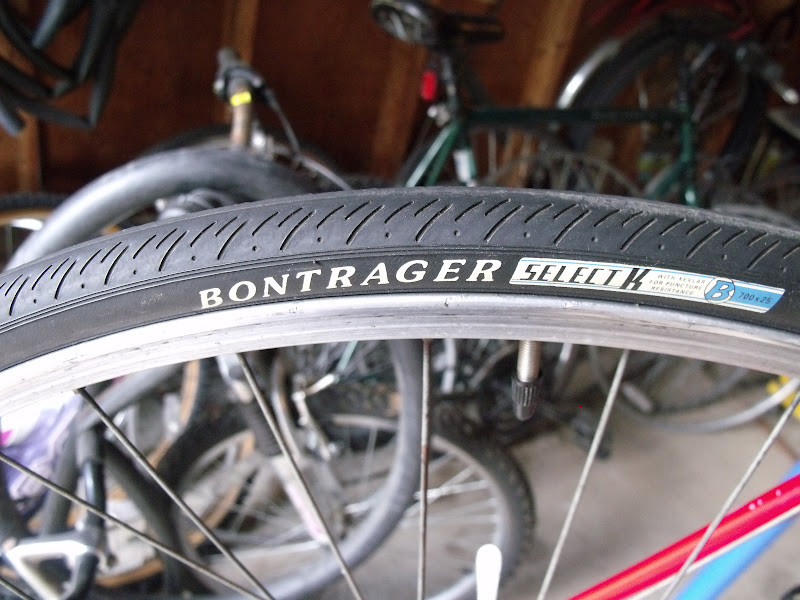
Above: At this point I had removed and remounted the tires. I found the inner tubes to be in excellent condition with no patches. When I remounted the tires I centered the valve stems with the tag or label on the tire. Also making sure the tags would be facing the drive side when finished. I used the R in Bontrager as a reference point.
Above: For about eight dollars US I was able to add a smaller size wedge bag and for another five dollars a tube repair kit with levers. You can also see the Ze'Fal three mode tail tight I installed.
Above: A shot of the Ze'Fal three mode headlight. These run about 20.00 for the set and they include 5 AAA batteries. For a bit more you can replace the AAA batteries with rechargeable batteries, that they claim can be recharged hundreds of times. In the long term that is probably the most economical and definitely the most responsible way to go.
Above: Did I hear someone say, Just show the &%$ @!*& bike already! OK, Here it is a classic American road bike for a total cost of about 173.00 price. Finally a bike I could easily double my investment on. Take away the lights, bag and kit and it is crazy cheap! About 140.00 US. Not to shabby!
Above: Here is the 140.00 (total investment) version of this bike! Now remove those two water bottle cages, and you are now looking at a 100.00 bike! now that is Crazy Cheap!
Above: Another view of the 173.00 version. Not as quite as sweet looking as the Centurion. But none the less the TREK 330 is a fine looking road bike.
Above: Here is the latest version of the little red fixed gear bike with the flip flop hub . This thing is fun to ride. But it is way to small for me to be hanging onto it. I really need to put this bike up for sale soon.
Above: Recently I have become a big fan of these Specialized ergo grips. If you are looking for a more comfortable grip for your cruiser or hybrid you might want to consider these.Until next time, Please RIDE SAFE and Remember to Always...RESCUE, RESTORE & RECYCLE Cheers, Hugh
P.S. Please remember if you are going to shop Amazon dot com, You can Help Support This Blog by using my link to Amazon located in the right hand column near the top.
Showing posts with label Trek 330 for restoration. Show all posts
Saturday, August 11, 2012
Thursday, August 2, 2012
Assessing The Trek 330 For Light Restoration / And I Try Clipless Pedals For The First Time
Hello and Welcome, Please Help Support This Blog by simply shopping for your bicycle needs or countless other products using the "Amazon Search". It is located in the right hand column just below the Face Book logo/link. If you have never shopped Amazon dot com, You will be amazed at the vast selection of goods available. You might also be surprised to see some of the suppliers who offer their goods on Amazon. I will receive a small commission for any sales that originate from this blog. But you must access Amazon from this blog. Many of you have told me how helpful this blog has been for you. Now you have an opportunity to help Keep it Going. If you would like to make a donation but do not want to shop Amazon. There is a Pay Pal donation gadget at the bottom of the right hand column. Thank You for Your Support, Hugh
Above: The Trek 330 as I found it at one of my favorite bicycle hunting spots. The first thing that impressed me about this bike were the Shimano clip less pedals. This will be my first experience with clip less pedals. I can hardly wait to find out if they can live up to all the hype.
Above: Another thing I could not help but notice are these white brake lever hoods. These are extremely difficult to find and they demand a premium price. If they do not clean up well, it may be cheaper to just replace them.
Above: The Shimano EXAGE brake calipers look to be in fine condition. These will clean up nicely. And look at the tread wear or "lack there of" on these Bontrager Select K road bicycle tires. I have a hunch these are a recent replacement but that will take closer inspection to confirm.
Above: They must have sold a million of these Avocet touring bicycle saddles in the 1980's. This one is badly scraped on the right side. The right side pedal is scraped as well, but the damage appears to be only cosmetic. I noticed the right side cork tape was scraped as well. This bike has obviously been down, but does not appear to have suffered any serious damage. I am happy to see the micro adjust seat post. This one appears to be of decent quality and is in really good shape. That is a big plus.
Above: The rear derailleur is also scratched but the alloy looks good. and I do not see any real damage. I can probably touch up the metallic paint if I can locate a color match. The chain appears to be good quality. If it cleans up well and is not stretched or worn I will probably re use it. I do not see any teeth missing on the free wheel sprockets and they do not look to be excessively worn. But seeing how I missed that on the Teton the first time around I`ll check it very carefully.
Above: That's what I am talking about! My favorite road bike crank set the Shimano Bio Pace, and it spins straight! Sweetness! And the Shimano EXAGE front derailleur looks ok. It appears that the clipless pedal took all the damage in this area when the bike went down. Also it is good to see the entire Shimano EXAGE package in tact. I have a set of pedals in mind for this bike already. Similar the the pedals on the red Centurion Accordo RS I did a few years ago. Just the prettiest little red road racer I ever worked on.
Above: I had to slip this in here, the Centurion Accordo RS. Damn that was a pretty bike. I will keep this bike in mind while I am restoring this red Trek 330.
Above: What are the three words I love to see engraved on a vintage alloy racing wheel? If you said MADE IN BELGIUM your right on the money. And they spin pretty straight as well! This just keeps getting better and better! Am I excited to be restoring this American classic? Is Bradley Wiggins having a good year? LTMS Yes to both of course!
Above: The drop handlebars are in fine shape. I`m not surprised as the scraping on the cork handlebar tape was minimal. The threaded Headset is super smooth and should be an easy service. (clean & lube) And the stem looks fine and should (like the bars) polish-up nicely with a little Mother's.
Above: Did they put these water bottle cages on every bike built in the 1980's? These are going to have to be replaced for sure. The down tube mounted shifters are in fine shape and will just get polished up a little. I ran the bike through all the gears and I am pleased to say, The index shifting is still "dialed in". No chatter in any gear but the shifting is a little sluggish. I am sure cleaning and lube and new Jag Wire shift cables will solve that problem.
Above: I have now had a chance to clean up and closely examine these tires. The tread appears to be all there and I can find no damage or chunks missing. And the side walls are very pliable with absolutely no cracking whatsoever. I will be removing the tires to check the tubes for patches and or creases. I will fine tune the wheels on the truing stand and remount the tires with the valve stems centered on the labels or tags.
Above: I did ride the bike as soon as I was 100% sure it was ride able. The brakes felt very strong and also very quiet. Upon inspection I found the shoes appear to be new. There is no apparent wear and the rubber has not hardened at all. I cleaned the shoes and I have no reservations about reusing them. Please spare me the comments about how you always replace the shoes no matter what. If you saw and felt these shoes (like I have) you would be a fool to replace them... period! I have also found other clues that tell me this bike was recently overhauled before it was parked. I have spotted some paint chip repair and fresh grease as well. And let's not forget the newer tires. Someone took very good care of this bike. And I like the choices they made as far as tires, shoes and pedals go. All good quality but not too pricey.
Above: With all the money I am saving on tires and brake shoes and inner tubes I was able to purchase better quality water bottle cages and better quality cork tape as well. Although they look fine I will be replacing all the cables with new Jag wire. I will also be installing a bicycle head and taillight set. And a new saddle, wedge bag and bicycle tool kit. I was considering a rack, but that is not the look I am after. And the Head Set and Three Piece Crank will be serviced as well. And the front and rear hubs will be serviced as always. And everything dirty will be cleaned and everything dull will be polished. I will also be doing paint chip touch up. The next post will be about the Trek 330 restoration.
Above: After a quick internet search I learned the Shimano clip less pedals are actually for a mountain bike. I thought "perfect" I have just the place for them. Before installing the pedals I took one with me to Cycle Therapy in Waterford. I needed to find out exactly what I was going to need in the way of shoes and cleats. It turns out they had the cleats but the shoes were pricy in my size. But they did explain to me what I needed in the way of shoes. I checked REI on the net because I had a 50.00 gift certificate. After I saw the shoes online I wanted, I called the store to check for size. They had my size plus a couple sizes larger and smaller. So off I went to REI of Troy Mi. The store was nice and well stocked , but a little to "Lah - Dee - Dah" for me. So after convincing the cashier I did not want to "join the club" I paid for my new shoes and headed for home.
Above: To play it safe I watched a short instructional video on You Tube about how to properly install the cleats. During which I pointed out to my wife that the guy was using the exact same wrench that I have. You can only imagine how excited she was to hear that...lol... Afterwards I installed the cleats with no problem. So Here's To You! Mr U-Tube Expert Cleat Installer Guy! (did that remind you of a beer commercial?) never mind
Above: To me it just made sense to get "Shimano cycling Shoes" for my "Shimano Cleats" to fit my "Shimano Pedals." Why go looking for trouble? In all I spent about 110.00 (less a 50.00 gift certificate) for shoes and cleats. Lets Ride!
Above: Ok let's bleed!.. lol... Ok! This had nothing to do with the cleats. This was more of a bad tire selection problem. The ride actually went great. I did feel like I was going farther with less fatigue. I practiced clicking in and out of the pedals several times with no problem. So what happened. When I got home I decided to take a victory lap around the house. I had to front wheel hop over a fallen tree limb that had that shiny half rotten slippery look to it. At when the tire came down I turned right and the tire broke traction on the damp dirt and plowed to a sudden stop. Putting these road type tires on my old Specialized Rock Hopper FS was STUPID. I ride on the pavement 99% of the time. It is that 1% on grass or sand or sandy pavement that keeps getting me into trouble. I have "biffed it" 3 times this summer. Each time loosing traction unexpectedly.
Above: These Kenda K West tires are not bad tires. They are just the wrong tire for me. I will probably switch to a shallow or short knobby tire. Something that will roll smooth but still give me some much needed traction during that 1% of the time I spend off the pavement. Is that a Lucky four leaf clover sticking out of my tread? I guess that only works if your Irish. Above: A few of the new tools I have picked up this year. Until next time Please RIDE SAFE (not like me) and Remember to Always...RESCUE, RESTORE & RECYCLE!! Cheers, Hugh
Above: The Trek 330 as I found it at one of my favorite bicycle hunting spots. The first thing that impressed me about this bike were the Shimano clip less pedals. This will be my first experience with clip less pedals. I can hardly wait to find out if they can live up to all the hype.
Above: Another thing I could not help but notice are these white brake lever hoods. These are extremely difficult to find and they demand a premium price. If they do not clean up well, it may be cheaper to just replace them.
Above: The Shimano EXAGE brake calipers look to be in fine condition. These will clean up nicely. And look at the tread wear or "lack there of" on these Bontrager Select K road bicycle tires. I have a hunch these are a recent replacement but that will take closer inspection to confirm.
Above: They must have sold a million of these Avocet touring bicycle saddles in the 1980's. This one is badly scraped on the right side. The right side pedal is scraped as well, but the damage appears to be only cosmetic. I noticed the right side cork tape was scraped as well. This bike has obviously been down, but does not appear to have suffered any serious damage. I am happy to see the micro adjust seat post. This one appears to be of decent quality and is in really good shape. That is a big plus.
Above: The rear derailleur is also scratched but the alloy looks good. and I do not see any real damage. I can probably touch up the metallic paint if I can locate a color match. The chain appears to be good quality. If it cleans up well and is not stretched or worn I will probably re use it. I do not see any teeth missing on the free wheel sprockets and they do not look to be excessively worn. But seeing how I missed that on the Teton the first time around I`ll check it very carefully.
Above: That's what I am talking about! My favorite road bike crank set the Shimano Bio Pace, and it spins straight! Sweetness! And the Shimano EXAGE front derailleur looks ok. It appears that the clipless pedal took all the damage in this area when the bike went down. Also it is good to see the entire Shimano EXAGE package in tact. I have a set of pedals in mind for this bike already. Similar the the pedals on the red Centurion Accordo RS I did a few years ago. Just the prettiest little red road racer I ever worked on.
Above: I had to slip this in here, the Centurion Accordo RS. Damn that was a pretty bike. I will keep this bike in mind while I am restoring this red Trek 330.
Above: What are the three words I love to see engraved on a vintage alloy racing wheel? If you said MADE IN BELGIUM your right on the money. And they spin pretty straight as well! This just keeps getting better and better! Am I excited to be restoring this American classic? Is Bradley Wiggins having a good year? LTMS Yes to both of course!
Above: The drop handlebars are in fine shape. I`m not surprised as the scraping on the cork handlebar tape was minimal. The threaded Headset is super smooth and should be an easy service. (clean & lube) And the stem looks fine and should (like the bars) polish-up nicely with a little Mother's.
Above: Did they put these water bottle cages on every bike built in the 1980's? These are going to have to be replaced for sure. The down tube mounted shifters are in fine shape and will just get polished up a little. I ran the bike through all the gears and I am pleased to say, The index shifting is still "dialed in". No chatter in any gear but the shifting is a little sluggish. I am sure cleaning and lube and new Jag Wire shift cables will solve that problem.
Above: I have now had a chance to clean up and closely examine these tires. The tread appears to be all there and I can find no damage or chunks missing. And the side walls are very pliable with absolutely no cracking whatsoever. I will be removing the tires to check the tubes for patches and or creases. I will fine tune the wheels on the truing stand and remount the tires with the valve stems centered on the labels or tags.
Above: I did ride the bike as soon as I was 100% sure it was ride able. The brakes felt very strong and also very quiet. Upon inspection I found the shoes appear to be new. There is no apparent wear and the rubber has not hardened at all. I cleaned the shoes and I have no reservations about reusing them. Please spare me the comments about how you always replace the shoes no matter what. If you saw and felt these shoes (like I have) you would be a fool to replace them... period! I have also found other clues that tell me this bike was recently overhauled before it was parked. I have spotted some paint chip repair and fresh grease as well. And let's not forget the newer tires. Someone took very good care of this bike. And I like the choices they made as far as tires, shoes and pedals go. All good quality but not too pricey.
Above: With all the money I am saving on tires and brake shoes and inner tubes I was able to purchase better quality water bottle cages and better quality cork tape as well. Although they look fine I will be replacing all the cables with new Jag wire. I will also be installing a bicycle head and taillight set. And a new saddle, wedge bag and bicycle tool kit. I was considering a rack, but that is not the look I am after. And the Head Set and Three Piece Crank will be serviced as well. And the front and rear hubs will be serviced as always. And everything dirty will be cleaned and everything dull will be polished. I will also be doing paint chip touch up. The next post will be about the Trek 330 restoration.
Above: After a quick internet search I learned the Shimano clip less pedals are actually for a mountain bike. I thought "perfect" I have just the place for them. Before installing the pedals I took one with me to Cycle Therapy in Waterford. I needed to find out exactly what I was going to need in the way of shoes and cleats. It turns out they had the cleats but the shoes were pricy in my size. But they did explain to me what I needed in the way of shoes. I checked REI on the net because I had a 50.00 gift certificate. After I saw the shoes online I wanted, I called the store to check for size. They had my size plus a couple sizes larger and smaller. So off I went to REI of Troy Mi. The store was nice and well stocked , but a little to "Lah - Dee - Dah" for me. So after convincing the cashier I did not want to "join the club" I paid for my new shoes and headed for home.
Above: To play it safe I watched a short instructional video on You Tube about how to properly install the cleats. During which I pointed out to my wife that the guy was using the exact same wrench that I have. You can only imagine how excited she was to hear that...lol... Afterwards I installed the cleats with no problem. So Here's To You! Mr U-Tube Expert Cleat Installer Guy! (did that remind you of a beer commercial?) never mind
Above: To me it just made sense to get "Shimano cycling Shoes" for my "Shimano Cleats" to fit my "Shimano Pedals." Why go looking for trouble? In all I spent about 110.00 (less a 50.00 gift certificate) for shoes and cleats. Lets Ride!
Above: Ok let's bleed!.. lol... Ok! This had nothing to do with the cleats. This was more of a bad tire selection problem. The ride actually went great. I did feel like I was going farther with less fatigue. I practiced clicking in and out of the pedals several times with no problem. So what happened. When I got home I decided to take a victory lap around the house. I had to front wheel hop over a fallen tree limb that had that shiny half rotten slippery look to it. At when the tire came down I turned right and the tire broke traction on the damp dirt and plowed to a sudden stop. Putting these road type tires on my old Specialized Rock Hopper FS was STUPID. I ride on the pavement 99% of the time. It is that 1% on grass or sand or sandy pavement that keeps getting me into trouble. I have "biffed it" 3 times this summer. Each time loosing traction unexpectedly.
Above: These Kenda K West tires are not bad tires. They are just the wrong tire for me. I will probably switch to a shallow or short knobby tire. Something that will roll smooth but still give me some much needed traction during that 1% of the time I spend off the pavement. Is that a Lucky four leaf clover sticking out of my tread? I guess that only works if your Irish. Above: A few of the new tools I have picked up this year. Until next time Please RIDE SAFE (not like me) and Remember to Always...RESCUE, RESTORE & RECYCLE!! Cheers, Hugh
Subscribe to:
Posts (Atom)