Hello and Welcome,
It has been a while since I updated the blog, for this I apologize. The weather has been insufferable and has really been "wearing me down". I have been getting up early and working
before it gets too hot to do anything. By the time I get the tools put away, (usually around 1 or 2 pm) I am soaked in sweat and exhausted. I find it impossible to write when I am completely drained. Today I quit early and turned on the a.c. So I am feeling pretty good today.
Below is a picture of the Rusty Raleigh where I left off on my last post.
Above: I convinced myself that the front fender would not be a problem because it looks pretty much the same as it did when the bike arrived. lol Yeah right. We will get back to that in a little while.
Above: I was sure I had a set of English 26 tpi thread
quill pedals. It turns out I used them on another project. So I decided to try to salvage the original pedals. They came out much better than I expected. And considering this is an old style Raleigh upright
touring bicycle, I think it would look better to have the correct
block pedals. Besides they have that really cool Raleigh logo molded into the blocks.
Above: I think these block pedals look really good on an old English
3 speed bike. This is definitely not a 3 speed, but is in that same classic English style. The restoration is coming together nicely, especially considering all the time this bike has spent out in the weather.
The new
Kenda gum wall tires look fantastic. The rear tire cleared the fender with out a problem. The front tire rubbed the lower back inside of the fender or mud-guard badly. (no real surprise there) My first idea was to change the struts. I do have some salvaged struts I have been saving for just such an occasion. Unfortunately none of them were any longer than the original struts. My next thought was to fashion some sort of a "strut extension".
Above: Digging through my miscellaneous small parts I found these L shaped brackets. First I flattened them out on the anvil part of my
shop vise using my
Ball Pein Hammer. Now I have a flat piece of metal with an elongated hole at one end. Holding the piece up to the strut mount it looked like I just needed the end with the elongated hole "on the now flat bracket" to extend the strut. So I cut it off using a
hacksaw and fortunately it worked perfectly.
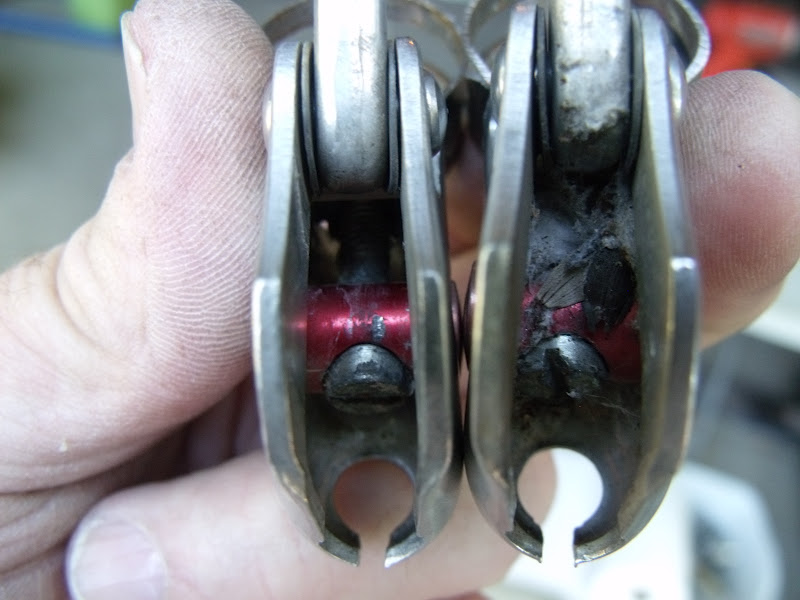
Above: Just like the pedals, I had no plans of restoring the original
touring brake levers. I had decided that I would use the brake levers off my unrestored 1964 Raleigh Sports 3 speed. As luck would have it, I was not able to locate one of the levers. So I had to try to reuse the original brake levers. First I cleaned up the outer body and lever handle using the
fine brass wheel brush on the
18 volt rechargeable drill. This actually worked out real well.
Above: To clean out the inside of the body or frame I dug out the spider sacks using a very small slotted screw driver. Then cleaned it up using a Q tip with a little
Turtle Wax Chrome Polish and Rust Remover on the tip.
Above: The constrictor clamps on the brake levers were badly rusted. I tried to remove the rust using the brass wheel brush with very little success. First I should mention that I wanted to replace the clamps with clamps from salvaged levers. But I had none that were big enough. This is another first. I used the
small angle grinder to remove the rust.
Carefully using the underside of the grinding wheel. It actually worked pretty good. Desperate times call for desperate measures!
Above: As for grips, I planned on using these
Dimension cork grips with a good coat of shellack. The
touring handlebars were just too fat for the cork grips. The grip split as I carefully tried to make it fit. I will try to glue the crack and use the cork grips on another project. So for a temporary solution I borrowed a set of white grips off another bike. I have since replaced them with black grips that are not original. But they are the same "smaller size" and are much more comfortable than the originals. So it is a change I can live with.
Above: This wonderful "period correct"
bicycle tool bag came in on a Schwinn World. After a good cleaning inside and out and some "Bear Grease" on the leather, it looks fantastic. I hope Brian leaves it on there, because it really does look good and correct on this style bike.
Above: The Raleigh decals that were generously donated for this project by Darrell Yarborough from "Bent Wrench Restorations" in Arlington Hts. IL look great. Thanks Darrell. I did not get them perfectly straight, but I think I did ok. Unlike wet decals, You really need to get these right the first time. So my advice is, Put these on before you drink your morning coffee :)
Above: As usual I used
Jag Wire X Caliper brake shoes, cables and cable housings. A good tip to remember: When you cut the housings for the stem mount shift cables make sure you cut them both the exact same size. And cut them just long enough for the cable to move smoothly through the housing. I have seen them cut (1) way too long or (2) way too short or (3) cut different lengths altogether. None of those three will look professional. And as always put a drop or two (depending on housing length) of clean cable oil in each housing before you insert the cable.
Above: Another first for me. The gold detail around the lugs and on the fender tips. I used
Testors gold enamel purchased from Tower Hobbies online. I also purchased a set of
camel hair paint brushes from Tower. This is another project you might want to try Before you drink a lot of coffee! Because the original fenders on this model year are kind of plain Brian (the owner) and myself decided to "dress up" the fenders a bit with a little gold detail.
Above: A shot of the front fender tip gold detail. I do have a little touch up to do, but overall I am pleased with how the gold enamel came out.
Above: My favorite Raleigh decal and the rear fender tip detail.
Above: The Raleigh as is it looks right now. (seriously I just took this pic moments ago) Do not stress out over the saddle, it is temporary. No worries! Brian has ordered a Brooks saddle for the faithful steed.
Above: Just a reminder of where we started. It has been one amazing ride!
UPDATE: The formerly Rusty Raleigh Sprite shown with Brian's
Brooks Saddle. Excellent Choice, Well Done Brian!
Until next time, RIDE SAFE and remember to always RESCUE, RESTORE & RECYCLE
Cheers,Hugh
ATTENTION AMAZON SHOPPERS!! You can help Support This Blog by simply logging onto Amazon dot com using the Amazon Search Box located at the Top Right Corner of This Page. It will not effect your cost and I will receive a small commission. Thanks for your support, Hugh


What is "bear grease?" I usually use Leatherique, though I do have a homemade concoction that is mostly anhydrous lanolin.
ReplyDeleteHey Steve,
ReplyDeleteBear Grease is a leather dressing. It is now called "Bear Leather Dressing" and in small letters below that on the tin it reads (bear grease) My Dad used it on his natural leather cowboy boots when I was a kid. It is still available at
http://www.amazon.com/BEAR-Leather-Dressing-Bear-Grease/dp/B003SKHAI4
I still have those old boots around here somewhere.
Cheers, Hugh
Glad to see your blog up and running again. It's hot as hell and dry too here in New Jersey. You've really worked you magic on this one. Bear grease, huh... I wonder how they get the grease off the bear. lol =)
ReplyDeleteWow...just...Wow. What a transformation Hugh. All that extra "I wasn't planning on using the original..." work you did to get everything to spec will hopefully earn you a lot of good bike karma ;-). The gold lug lining and Schwinn "Hold All" really make this shine. Chapeau! may the cool weather gods send some breezes your way.
ReplyDeleteHey John,
ReplyDeleteThanks, I am very satisfied with the way the Raleigh turned out. Looks like this is going to be another summer for the record books.
Bear Grease and Saddle Soap are both really "old school". But they both work great, I guess that's why they are still around. And thanks, it`s good to be back :)
Cheers