Hello and Welcome,
I prepped the Zebrakenko mixtie for primer the other day and just as I was carrying it out back to spray, a neighbor just south of me started cutting his very dry grass with his tractor. This created a huge dust cloud that was blowing my way.
Above: So I carried the frame still dangling from the Park PCS work stand by bailing wire back into the shop and parked in the corner again. So it goes...
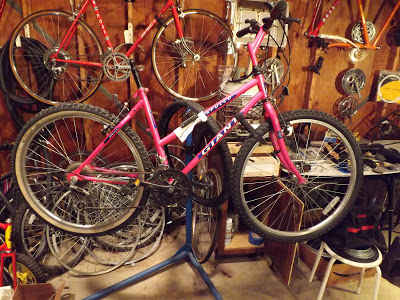
Above: About a week ago I found this 1980's Giant rigid woman's mountain bike. I have a good reason to be happy to have found this pink Giant rigid. But I will get to that in a little bit.
Above: My regular blog followers might remember the rear brake set up on Laura's Trek. Particularly the lever set up that required a two piece brake cable and a knarp. I described it as "engineering designed to impress" rather than to actually improve performance". I thought it was silly then, and I still do. But what brought that to mind after all this time?
Above: This set up is what got me thinking about Laura's Trek again. Simplicity is a beautiful thing. Here is the rear brake cable pulley on the woman's Giant rigid mountain bike. The Raleighesque pulley wheel is removable for replacement. One continuous cable directly (indirectly might be a better word) connected to the cable hanger. And if your wondering about performance? Yes it functions beautifully, even after years untouched in storage. Of course the brake shoes are hard as a rock. But that is to be expected.
Above: While I am on the subject of simple and serviceable engineering that works really well.. You gotta love these Shimano SIS thumb shifters. Not very impressive, but reliable as they could possibly be. And very easy to replace the shift cable or the entire unit for that mattter. Well I can see why they got rid of these damn things. They just made too much sense. God forbid anyone would want a simple system that works great and is really easy to service. I have met other casual cyclists like myself who also prefer these simple and reliable shifters. But just why did I buy this Pink bike anyway? My God, it Is bloody ugly! But also beautiful in it's functional and serviceable simplicity. However, in the past I have not had much luck finding new homes for obnoxiously Pink bikes.
Above: With the exception of the Pink Mongoose Freestyle Girl a bike that went rather quickly. But it was in "like new" condition and was priced to move. I did not make any money on that bike, but at least I didn't loose any either. OK back to the question,so why did I buy this "not so perfect" pink Giant mountain bike?
Above: When looking at the pink 1980's Ladies Giant.. I thought wow! I bet I can salvage enough off this bike to pretty much build the Orange 1980'S Men's Giant rigid frame bike (BLACK ARROW) that has been hanging from the Garage/Shop wall for "God only knows how long". And just maybe I can finally make good use of the new crank (RED ARROW) that is still on the left over "parts bike" from the for mentioned Laura's Trek build. At this point I am picturing (in my mind) a pretty sweet looking little rigid frame mountain bike. I am thinking about using some "high volume phat on/off road tires" like on the chrome Raleigh Teton. A hell of a good idea, if I may say so myself.
Above: The front and rear 26 inch FEMCO wheels spin straight with no noticeable grind or wobble. They appear to be in excellent condition. I will still check both wheels for true. Then I will break down the axles and inspect the axle, cones and bearings then clean and re grease everything.
Above: The front axle has a quick release skewer (always a good thing) and the hub looks like it will polish up nicely with a little "Mother's Mag and Aluminum Polish". I noticed the front wheel was on backwards with the skewer lever on the drive side. But the cyclometer is set up for the wheel being on backwards, So for now I will just flip it back around.
Above: If the Cyclometer works I may use it on the build. Or possibly even install it on the 29'er.
Above: The handlebars, shifters, brake levers and possibly the grips will all be reused. (I might upgrade the grips) But if I want to reuse this stem, I will need to "make like Mick Jagger" and Paint it Black.
Above: The rear derailleur is ok, but I might have a better salvaged unit in my rear derailleur tub. If I remember right... the orange Giant has a threaded rear derailleur mount hole on the drop out. No doubt a higher end model than the Pink Giant.
Above: The front derailleur also appears to be very "entry level". But... If it cleans up nicely and functions well, I may reuse it. Again I will have to see what I have available in the salvaged front derailleur tub.
Above: This was a good plan, and still is. But the other day while I was raking stones off our freshly graded front yard, a friend called. He said something like "Hugh I have a couple bikes for you, they were in a customers basement. They have been trying to give them to me for years, so I finally loaded them up. Are you interested?"
My answer: "Yes I am definitely interested". So here is one of them, a Men's 3 Speed "All-Pro" (K Mart Bike). This pic was taken after a few hours of clean up. It handled the long term storage pretty well. All except for the rims that is.
Above: Here is a shot of "the rustiest part" of the front rim. This one I probably have a suitable replacement for. I have a Woman's Fuji 3 speed I have been stealing parts off for years. I would consider using the rear wheel as well, but the shift mechanism is on the opposite side of the rear hub.
Above: Here is the same shot of the rear rim. This wheel I do not have a suitable replacement for. I think I will brass wheel-brush both rims and polish them both up. And then I will decide if I need to replace them. I have a Wald front wire basket that I am sure will fit up front. And a Schwinn collapsible rear two sided basket (saddlebag style) that I might be able to retro fit. So basically I will be building a "delivery bike".
The same moisture that was bad for the rims, seems to have been good for the tires. They are in incredible shape considering, no visible cracking whatsoever. (Not visible until I got a good look at the digital photographs that is) There appears to be some cracking in the treads. I guess the tires could be replacements. But I doubt it, as everything else looks very much original. UPDATE: As of July 4th 2013 the tires are still holding air and maintaining pressure.
Above: I will be on vacation next week. I will try once again to update the blog from the island using my Dell lap top. I did not have any success accessing the net last year. This year I will find someone at the hotel to show me how to use the free Wi-Fi. Your not supposed to mention on face book when you are going to be on vacation. But the house will not be vacant my son will be staying at the house and taking care the place and the cats and critters.
As I am typing this our vacation has already begun and we will be driving up to Mackinac Island in the morning. I might just haul the Kalkhoff folding bike the trunk. I would like to see how it compares to bringing along a full size bike. Is the convenience really worth giving up a full size bike for a week? As I would not have to assemble it in the parking lot at the ferry service. Or worry about my new 29'er sitting out in the elements for a week.
Above: I took a break from writing this post and went out to the shop/garage for a while just to see if the collapsible rear baskets/rack would fit the 3 speed. As sometimes happens I kept on going wanting to see if the Wald front basket would also fit. Obviously it did :)
Above: After converting the stem mounted front reflector bracket to an extra mounting bracket for the Wald basket I decided to make up a basket mounted reflector bracket for the front reflector. I used some left over rear rack mounting hardware to fashion this reflector mount bracket. It took a little trial and error as well as some hack sawing and hammering and filing. But eventually I came up with something that should work. (and hold up) When finished I cut off the extra threads from the bolt so it would not snag on anything that might be placed into the basket in the future. For this cut I used the rotary tool with a mini cutting wheel.
Above: The rear collapsible baskets and clipped into position. Do not let the pictures fool you, there is still much work to do on this bike before it goes to work. But it will have to wait until we return from our holiday.
Until Next Time Please RIDE SAFELY and Remember to Always...RESCUE, RESTORE & RECYCLE
Cheers, Hugh
Outdoor Ventures Packable Jacket Review
2 weeks ago


