Recently I had the pleasure of doing some work on a FELT Q 720 Mountain Bike. I remember seeing a FELT on Mackinac Island with Hydraulic disc brakes and I was really impressed. As some of you already know I work on lots of...... let's say "less expensive" bicycles So this was a real treat. And as it turns out, an educational experience as well.

Above: Let's start with the chain. I got a call from my friend Brian (the owner of the FELT) early one evening. His chain had broke and He was stranded. He wanted to know if I had a chain in stock. It turns out I did have a "Shimano Multi Speed Chain" in stock, so off I went. I replaced the chain. After replacing the chain Brian told me it was skipping on the smaller cogs or (higher gears). I asked him which cogs he typically rode on and I think he said the bottom three. So thinking the cassette is worn (I already knew the bike had not been serviced in quite a while) I asked him to shift to the larger cogs. When he did the chain stopped skipping and seemed to be working ok. So I came to the conclusion that the 9 speed cassette was shot. I told Brian he could order one from me if He wanted to. (via my Online Bike Shop) He said that would be fine. So I told him I would go home and check stock and make sure I had his cassette in stock. I called Brian to make sure I had the cassette with the correct cog sizes. I told him I would label his cassette (in the online bike shop) so he would know it was the correct cassette. I believe I labeled it "Brian Order This One"..lol

Above: Here is the old cassette which I de greased using White Lightning Clean Streak. I will be cleaning up these cogs and then Brian will have some spare cogs as half of the cogs look to be fine.

Above: This is when the repair became frustrating. At this point I had cleaned up and lubed the rear derailleur which was really gunked up. The axle, cones and bearings have all been replaced. I also replaced the derailleur cable and the short cable housing at the derailleur. The inner workings of the Rapid Fire Shifter have been cleaned then sprayed with a silicone based lubricant. And I had replaced the cassette with the new one. But the damn chain was still dancing all over the smaller cogs and the damn thing was still skipping like crazy. I set the index with the chain on one of the center cogs, this did not help a bit. So I removed the largest chain ring and headed of to Cycle Therapy to get it checked. I was fortunate that Ernie "the proprietor" just happened to be there.

Above: Just happened to find this pic of Ernie on Google. Ernie and his Team at Cycle Therapy in Waterford Mi are Great. They have helped me out on more than one occasion. Ernie said the chain ring appeared to have plenty of miles left on it, and He didn't think that was the problem. So I told him step by step all the work I had done. At first Ernie suspected the rear derailleur might be the problem. That is until I mentioned the "Shimano multi speed chain". Ernie asked me, Is it a nine speed cassette? Yes it is, I said. Then He asked, Did the chain package say those exact words Multi Speed Chain? Again I answered Yes. Ernie said That is your problem. He went on to explain that a nine speed cassette like the one I am working on requires a nine speed chain. I said, That's gotta be it! That explains why the chain won't settle down, even though everything says it should be working fine.

Finally a solution! Ok, I install the new KMC 9 speed chain(above) and it seems to be working fine. It is now staying on the cogs and seems to be good to go. Although it seems to be louder than normal. Like it is barely fitting over the teeth on the front chain ring. I'm thinking maybe that is the wear on the chain ring. They said the chain ring did show "some wear". So I test rode the bike, and the bloody chain bound up on something and broke. CHEESE and FRICKEN RICE!!!! W.T.H.!!!! So I calm down and get on the computer and locate the specs. (finally)

Now I call down to CYCLE THERAPY and ask Chris (not the Chris I know, the other Chris) If he has the Shimano CN-HG53 Chain in stock. They do, "Excellent please leave it at the register and I`ll be down to pick it up straight away". Finally a solution! & it worked! The chain is smooth and much quieter and she is now shifting wonderfully. Thank You Bicycle Gods and Thank You internet. And Thank you Ernie for pointing me in the right direction.
Above: This is the first replacement chain (multi speed Shimano) floating around "particularly on the smallest three cogs" (7,8 & 9) Watch the chain on the smaller cogs. At this point I was getting frustrated. It was shortly after this that I removed the large chain ring and went to see Ernie at Cycle Therapy in Waterford. You can hear the frustration in my voice at the end of the video.


Above: Top Brian's rear axle and cones, the bottom axle and cones show normal wear. If you blow up this pic you can really see the difference. I was able to order the cones online for the rear axle as well. But at this moment I really can't remember from where...lol

Above: I had not planed to blog about this bike, so I never took any "before" pics. (my bad) So here is some of the work done on the rear end of the bike. First I rebuilt the hub replacing the cones, bearings & axle. Next the wheel went on the truing wheel truing stand. Sometimes you can tell if the wheel has been worked on before. I noticed that where the wheel was rubbing the pin indicating the spokes on the opposite side needed to be tightened, those spokes were already really tight. This tells me that someone may have already tried to straighten or true this wheel. So I check the spokes for tightness on the same side that the wheel is rubbing the pins (wheel truing stand) They are really tight as well. So I loosen the spoke or spokes (just a wee bit) near the rub allowing the wheel to be pulled away from the *pin*.(*pin* refers to the caliper pins on the stand that the wheel will rub if they are set close and the wheel is not straight) Also I was able to tighten the spokes on the apposing side just a wee bit.
Above: This gentleman has made the best wheel truing tutorial video I have ever seen. I don't think I have ever seen anyone explain the process better than he does. So I share this with you. And hope you enjoy it as much as I did.

Above: Here are the other things that were done to the rear half of the drive train. Violette Arrow ~> Installed the new 9 speed cassette.... White Arrows ~> Cleaned and lubed the entire rear derailleur paying particular attention to all the pivot points that connect the Upper Knuckle to the Outer Parrelogram which connects to the Lower knuckle..... Red Arrows ~> De-Ggreased and lubed the upper and lower Jockey wheels (huge chunks of crud cleaned off the jockey wheels) And cleaned the inner and outer Jockey Wheel Cage plates....... Blue Arrow~> Replaced the Chain.....how many times? lol "I'm not taken the rap for the second chain! ".......Green Arrow........made up a new short cable housing at the rear derailleur......Yellow Arrow ~> New Jag-Wire Shift Cable....Orange Arrow ~> cleaned up rims, spokes and pie-plate....Pink Arrows ~> Installed new inner tube and tire.
Above: Here I am cleaning away excess de-greaser before spraying the Rapid Fire shifter internals with Tri Flo (a silicone based lubricant) I also sprayed into the shift cable receiver hole with a de-greaser (Clean Streak) and after some drying time.. some Tri Flo lubricant as well. Cleaning and lubing your Rapid Fire Shifters will greatly improve their performance. (if they're just not shifting as well as they once did)

Above: The front derailleur would not even react when I first tried to shift it. After spraying and brushing it twice with Clean Streak and lubricating it with Tri Flo it seemed to work fine. I replaced the cable since I had removed the original cable to clean the Shifter internals. I probably could have re used it, it actually looked pretty good. But cables are cheap, so I went ahead and replaced it anyway.

Above: The pedals were shot so I put this cheap set on for Brian to use until he orders a new set. Hopefully he wont throw these away, I could always use them on some kids Department Store bike.

Above: I couldn't be more pleased with how the front hub and wheel came out. There was a lot of play in the front hub when I got the bike. I expected the hub to be destroyed inside, but it was not all that bad. I cleaned it out and replaced the cones and bearings and then it spun real smooth. And it trued up beautifully. Removing the discs is really easy. One of my Park free wheel removal tools fit the retainer ring perfectly.

Above: Brian has the FELT Q 720 back now, he is planing on installing a better rear rack. Also I think he has already ordered new pedals. Brian says he thinks their is a problem with the crank. I told him I am really not comfortable taking apart his Hollow tech crank. We plan on hauling the bike to Cycle Therapy to have the crank serviced. Hopefully I can see first hand how this crank works and how to remove it and replace it. I would rather the first Hollow Tech crank I work on belong to me.
Here are some random pics from the project
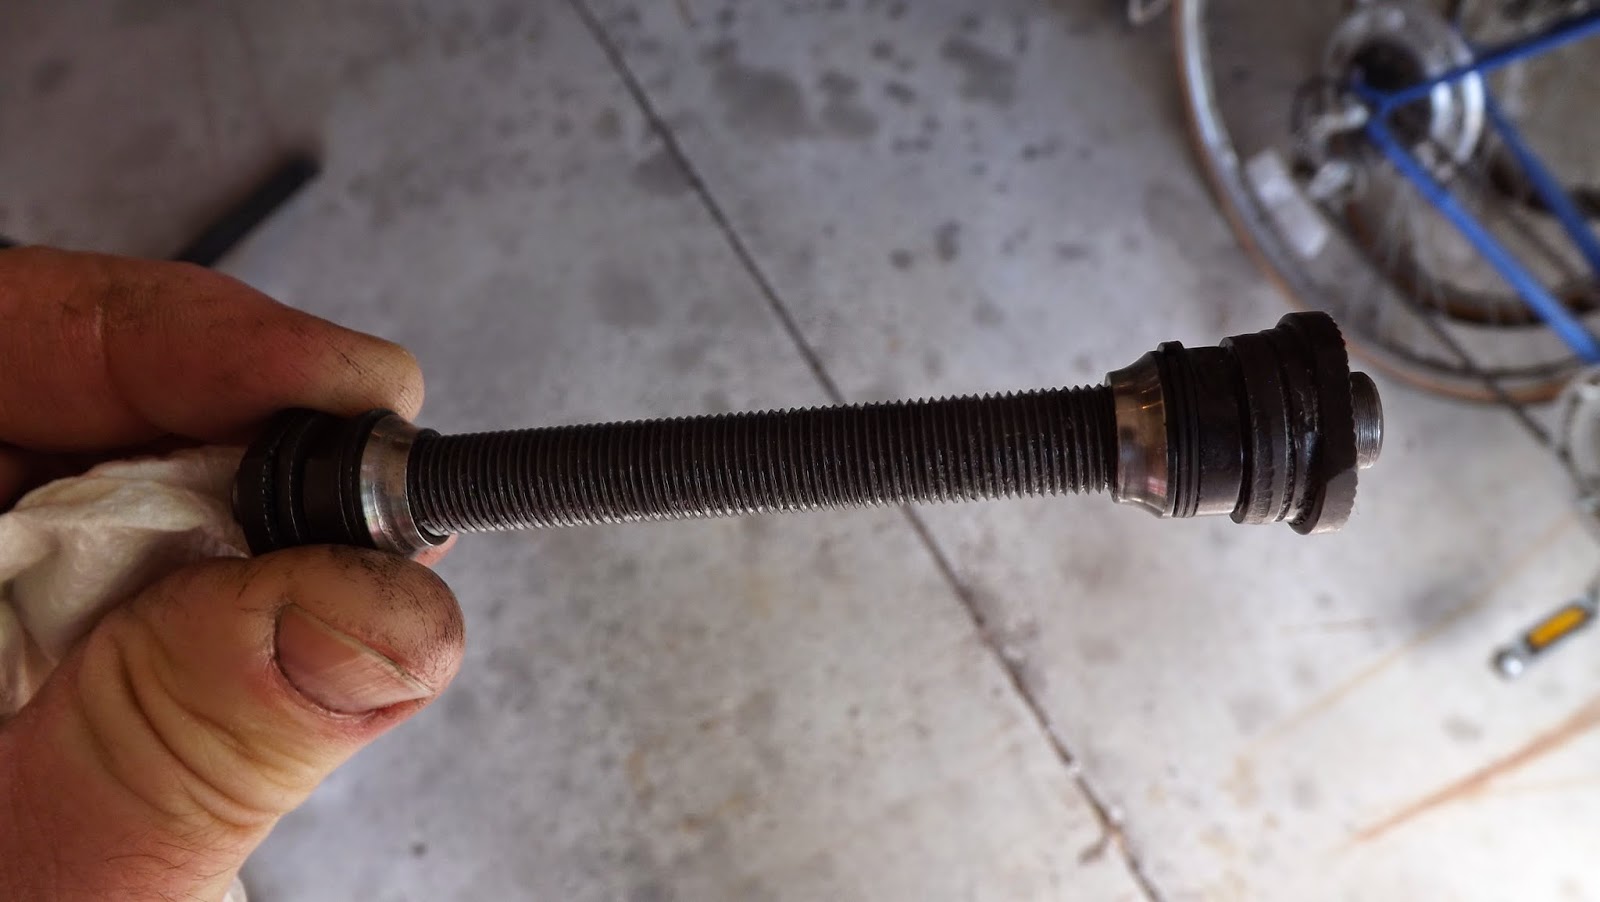
Above: The front axle and cones from the FELT Q720. Now I recall it was TreeFort Bikes in Ypsilanti Mi who had the correct cones in stock. I ordered these from their online store. Although I have never been there, I hear their bricks and mortar store is nice too!

<<<< The info for finding the correct cones is printed right on the hub. In particular the Shimano RM65. I actually located the cones for another Shimano hub first, but it stated they would also fit the RM65 hub as well. (I got lucky)

<<<< I always look for Campagnolo Grade 25 steel bearings, as I have been told it is the highest rating for steel bearings. On the other side of the bag it is labeled Campagnolo. I hear they make pretty good stuff too! ltms

Sorry for the delay folks, I mentioned on the Face Book page this would be published Sunday, obviously I didn't make it happen. Until Next Time...PLEASE... RIDE SAFELY!.......And Remember to Always.....RESCUE, RESTORE & RECYCLE!
Cheers, Hugh


Nice job Hugh, your friend got a much nicer bike back and thanks for the video I thinkI learned some new truing tricks.
ReplyDeleteGreat post,
ReplyDeleteThese cycles are looking most beautiful. I like it.
Thanks for sharing with us
Bicycle Trailer