Hello and Welcome,
I was hesitant for a long time to attempt a "one piece" to "three piece" bottom-bracket conversion. And honestly a few years ago my skill level was probably not up to doing the job. And even if I was ready to attempt one, my tool-box was not.
Above: The infamous Ashtabula
One Piece bicycle Crank also know (by some) as The Boat Anchor. For many many years this type of crank has been the standard for entry level bikes in the US. It is still used today, but mostly on single speed retro style bikes.
It bothered me the most that these were used on the Schwinn Continental(ABOVE) and also some of the early (Made in Japan) Schwinn 10 speeds. But especially the Continental. I mean here was the "flag-ship" of the
Schwinn Bicycle Co. line sporting Weinmann center-pull brakes, (which by the way were really cool back in the day) and then you look down and see this Gawd Awful Monstrosity of a crank. I am sorry I don`t mean to offend any Schwinn purists. Hey I love them too, But What the Heck were they thinking?
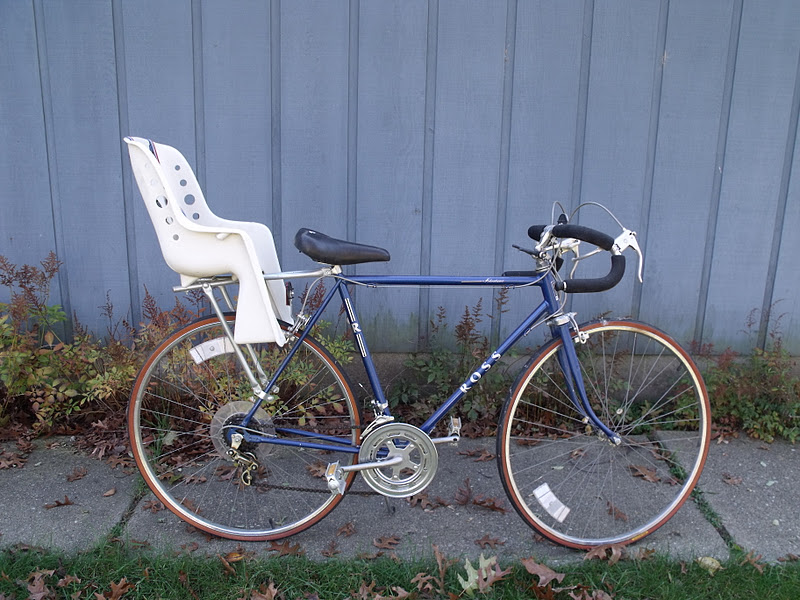
Above: I don`t have a Continental right now so I decided to use this Ross Adventurer. This by the way is the third one of these I have restored. All of them the same color and all with the Ashtabula style crank. OK time to Fast-Forward.
Above: The first order of business is to remove the crank bearing cups. These are pressed in so you have to punch them out. You punch these out from the opposite side, I`m using a large screw-driver. Something with a blunt-end would be better than using a screw-driver. You want to tap them out evenly as possible. So tap a few times then move your driver or punch-out tool directly across from there. Do this top and bottom and side to side if necessary.
Above: Now clean-out the bracket-shell and check for damage or rust. Sand or file off any burs you feel, Do this the same depth as the thickness of the conversion piece. You may want to sand off the paint the same depth as well.Now you are ready to check the
bottom bracket conversion kit US to Euro pieces for fit. These are also press-in parts, if they were not you would need to get the bracket shell threaded.
Above: This is the conversion kit I will be using. Notice it is marked L-left and R-right. Before I continue: You probably should have these pressed in at your local bike shop.Installing these without the correct tools it is likely that the kit and or housing will be damaged. Having said that, My next step is to take the kit apart. This particular one has 4 long bolts. Some have only three.
Above: In my case the conversion kit was a little too big to fit my bracket shell. I used my Dremal type
rotary tool to grind it till I felt it was workable. Before pressing it into place I check the position of the piece. I do not want to run-into any tubes with any of the four bolts. This kit has arrows on it, I note the position of the arrow when I have the cup-adapter in the correct position. After applying a very light coat of grease inside the bracket-shell where I did the grinding. I am now ready to press in the piece. I start the cup by gently tapping it into place with a plastic head mallet. This is tricky, It has to be flat or going in evenly.I do not want it tilted. This took a few attempts. I only tap it in far enough to hold it in place probably about 1/32nd to 1/16th of an inch.
Above: After experimenting with a Vice with blocks of wood then a Giant C-Clamp with wood blocks I finally came-up with this.
Above: My improvised
Bottom Bracket Installation Tool made with a piece of threaded rod two nuts and various size washers. Note: I took this pic after I started tightening the clamp/press. You would never want to tap a piece in this far. For the first side I used a larger washer on the opposite side (bigger than the housing) When I pressed in the second piece I used the brass colored washers on both sides. Making sure that the bolt holes lined-up first. I was fortunate to have the correct size brass washers on hand. They actually fit in the adapters inset perfectly. And being brass they are less likely to do any damage. They were in with some of my Dads tools I inherited. I guess Dad liked to hang onto any part he thought could be useful on some future project as well.

Above: After pressing in the first side I noticed one of the "excess' tubes inside the bracket shell was partially blocking one of the bolt holes. I managed to grind it down with my "Dremel like" tool. Funny thing, When I first got the Dremal like tool I thought to myself "This thing is going to be useless". Wow was I wrong about that, it really saved me on this installation.
Above: A top view of the second piece being clamp/pressed into place. To tighten the press, I just hold a wrench on the back-side nut and tighten the front nut with a another wrench. A
Gearwrench works best for this part.
Above: Obviously with all the grinding and sanding going on I had to keep cleaning out the bracket shell. You certainly do not want a bunch of metal shavings anywhere near your bearings. I used Simple-Green cleaning wipes to keep the shell clean. Now the bracket conversion is complete. Now I am ready to install a lighter, better-looking and more modern three piece crank set.
Above: While searching the shop/garage I found a Ross Carrera mixte that I had purchased basically for the wheel-set. I eventually used the front wheel on the fixed gear build. I am pleased that the donor bike is also a Ross, I will be able to make some up grades while staying true to the brand. Here I am getting ready to degrease the bottom bracket bearings, cups and spindle. After that I will polish-up and assemble the
Road bike crankset.
Above: I start with the drive side wrapping the threads with
Teflon tape. This will help prevent creaking and make for a tighter fit. And of course protect the threads from
moisture and contaminants. There is absolutely nothing different about this three piece crank install at this point. Except that the threaded cup pieces are now recessed into the conversion pieces a little. They will be a little harder to tighten, but not real difficult.
Above: Now that the drive side cup is in place I will turn the frame around and install the
bottom bracket spindle from the left side. I read somewhere that one restorer had trouble at the next point because the bracket shell was not square. This has been in the back of my mind since I started this. Hopefully that will not be the case for me.

Above: The left side went together without a hitch. As always I lightly coated the entire bracket spindle with grease. Then I packed the bearing cartridges with grease. After that I placed the drive side bearing on the longer end of the spindle with the exposed side of the bearings facing outward. Then the left side bearings go on facing me. Next I slide the spindle into place. When the bearings make contact with the outer cup I always twist the spindle a little to make sure the bearings are riding in the cup smoothly. Then I carefully slide the left side cup into position while keeping the spindle in place. After I start screwing the cup into place I stop and wrap the threads with Teflon. Then just tighten until I feel no play or grind. Then screw the lock-ring on to hold everything in place.

Above: As I mentioned before the lock-ring and cups are now recessed a little. So I have to finish tightening it with a screw driver because it is in to far for the lock-ring wrench to work properly. It`s not a big deal, we did them all this way when I was a kid. Before I turn the frame around I will install the left side arm.
Above: For good measure I put a little
thread lock on the threads before screwing the retainer nut on tightly using a socket and ratchet. You might find it easier to put the thread-lock on the nut threads.After installing the dust cap it is time to turn the frame around so I can finish this up.
Above: At this point I have polished-up the crank and re-assembled it. It goes on the same way with a little thread-lock on the threads.
A Quick Tip: Use a penny and needle nose pliers to remove and tighten dust caps. I have never found a better way to do this. The cheapest tool I own, it only cost me a penny!
Above: A nice comparison shot. As you can see the old Ashtabula one piece crank on the floor. Anyone want to buy a good
boat anchor?
UPDATE: The Above
BB Conversion BP American to Euro by Bulletproof can be ordered on Amazon dot com. It will actually come from Niagara Cycle. The cost is about 15.00 US.
Until next time, Please RIDE SAFE and Remember to Always RESCUE, RESTORE & RECYCLE
Cheers,Hugh


Looks great Hugh what a difference the 3 piece crank-set makes. It wasn't clear at first from that the conversion kit was threaded to receive the bb cups but I see from your step by step pictures they are-makes sense. Not that riding old steel lends itself to worrying about grams but I would be curious what the weight difference of the boat anchor crank is vs the 3 piece plus conversion kit. Thanks for the excellent Post, I will remember this if I happen across a old Continental for a song.
ReplyDeleteRyan
This comment has been removed by the author.
ReplyDeleteThanks Ryan.
ReplyDeleteAfter I finished, I moved the one-piece crank to take a photograph. After handling the three piece crank I could not believe the weight difference. I should have weighed them both for comparison. But it is too late for that now. It also got me thinking, How much could you lower the weight of a Schwinn Continental? And could you do it without spending a lot of cash? Sounds like a future post to me.
I know it could never be a lightweight. But none the less, with so many pounds to work with. I think the results would be amazing. I`ll have to start keeping an eye-out for a nice Continental. Hopefully one of the models with the chrome fork :)
About the conversion kit. Once you get the adapter kit installed, It`s pretty much like installing any typical 3 piece crank.
I do think that anyone doing one of these should strongly consider getting the adapters
pressed in by a professional.
Cheers
Hello,
ReplyDeleteWere the old cups salvageable? And the conversion brackets had lips on the outer edge, wouldn't that keep them from being driven in too far. guess I'm wondering how tight was every thing to start with and would it be something to tryout on a "donor bike", disassemble and put onto a "keeper bike".
Great post as usual. Maybe you should apply to these manufacturers for a position as a technical writer.
All I will say is you are a braver man than I am!
ReplyDeleteHey John,
ReplyDeleteIf you mean the used cups off the donor bike yes they were in fine shape.(after cleaning) I have also saved the original press-in cups from the one piece crank. They are both low mileage bikes. The only difference is, the donor bike was banged around in an old shed for years.
And yes the adapter cups have a lip that prevents them from being pressed in to far. For that matter, so do the original one piece crank cups. Just not as pronounced as on the adapters. About torque, The four bolts that connect the two converter pieces are not very thick. Maybe less than an 1/8th of an inch. I just tightened them till they "stopped" Then maybe a 1/4 to 1/2 turn after that. (the unit came with no instructions or max torque specs)
I don`t really know if the adapters would be such a tight fit on an old Schwinn. If not, maybe the the four bolts are necessary to hold the cup adapters in place. I won`t know for sure until I install one on a Schwinn.
If you practice on an old frame that might be a good idea. But I would not do any grinding on the cup adapters just the bracket shell (if necessary). Grinding them down might make them maybe too small for the "keeper bike". Also I would recommend, if I were to press them in. That they are not so tight that maybe they can`t be re-used. In other words, If I were going to practice on a junk frame. I would be sure to keep it a little loose. I would not want to risk damaging the adapters on a junk frame.
Thanks for the compliment about my writing. If I do get paid to write one day, It will most likely be from sponsors or advertisers. I have been self employed most of my life. And at this point I don`t know if I am capable of changing that arrangement. I would tell people who did not know me well that "My boss is a real s.o.b.!" When they would ask me "Who do you work for?" I would always laugh and say I work for myself.
Cheers
Hello,
ReplyDeleteHow did you get the four holes for the through bolts on opposite sides to line up properly? As always, another interesting post.
Thanks!
Hey J
ReplyDeleteGood question. There are triangle symbols engraved on the outer face of the adapter pieces. When I am ready to press the second adapter into place. I use the triangles as a reference. When they are in the same position
(mine were at about 11`O clock) the holes should match up. However I did visually check mine as well.(like a peep sight) You could also check the alignment with an awl if you wanted. I set my adapters with a plastic head mallet before I mounted the press/clamp. So it is not as difficult as it may appear.
Cheers
Hey Steve,
ReplyDeleteTrust me, It took me at least a year and a half to talk myself into trying this. I would not call that brave :) I was hoping to hear what you thought of my improvised clamp/press?
The fact that I am not an engineer helps. Because I have no idea how bad this could have gone. Or how much much danger I might be putting myself in. Ignorance really can be bliss! Cheers
The clamp/press is a sound approach. And you proved it!
ReplyDeleteI liked your rigged press just fine, Hugh. I particularly like how you contemplated other ways but kept at it until you came up with an elegant solution. (it was a smart idea to lay that crusty old giant C-clamp there as a warning to the bike.)
ReplyDeleteAs a side note, a while back when I thought I would have to cold-set my old Schwinn frame to receive a new 130 mm hub, I did some homework. Sheldon said something about using a 2x4 which appealed to the carpenter in me, but sounded imprecise. So me and the Voice cooked up a rig that looked a lot like your improvised cup press, but would have worked in reverse, allowing one-wrench-turn adjustments.
But I would have placed a 2x4 nearby for the bike to consider.
TJ
Thanks TJ
ReplyDeleteNecessity truly is the Mother of invention :)
Cheers
Thanks Steve,
ReplyDeleteBecause of your field of expertise, I always pay particular attention to your feed-back.
Cheers
What is the make/model of the adapter you used? Can you post a link to where it might be purchased? Thanks!
ReplyDeleteHey Scott,
ReplyDeleteThe < BB Conversion Bp American-To Euro by Bulletproof > can be ordered on amazon dot com.
It will be shipped through Amazon by Niagara Cycle. The cost is about 15.00 US. Good Luck with your project. Cheers
Your penny dust-cap tool has mine beat. My tool cost me a nickel.
ReplyDeleteThe bottom bracket conversion project was an ambitious one. I would doubt if many 'professional' bicycle mechanics have attempted anything similar, probably mainly because there is little demand at the LBS for such a changeover.
I looked at the conversion kit carefully, wondering if there could be a way to design a kit so that there is no protruding overhang to interfere with tightening the lock-ring, thus necessitating the use of a screwdriver, but at this moment I see no other way to do it. Maybe you have some thoughts on possible design enhancements.
Once again, very interesting reading, Hugh. Your blogs cover aspects of bicycle mechanics not found anywhere else. Truly original stuff!
Hey F.P.88
ReplyDeleteFirst a sincere Thank You for the kind words. In regards to the conversion kit. I think the answer might be to design a new tool. I`m picturing something similar to my adjustable "angle grinder" wrench. It is Y shaped with a peg sticking outward near the end of both arms of the Y. In the center it has an axis with a thumb-screw. This is so the width of the spread cab be adjusted to fit the grinder you are using. The only difference would be, the pegs would be squared-off. And they would need to be (guessing) about 3/8 to 1/4 inch long. I would not be surprised if someone already makes a tool that would work.
Actually I just located one that might be suitable the OTC 6613 Variable Pin Spanner Wrench (Google Image search) Now that looks like a "must own tool" if I ever saw one. It seems I have some "Tool Shopping" to do now. I hope you don`t mind "taking the blame" if my wife complains..lol
Cheers
We used a lot of these, back in the day, to do 3-piece conversions on bmx bikes, and to build klunker mountain bikes.
ReplyDeleteThe version we were using in the early to mid-90s specified cartridge bottom brackets. That eliminated the lock-ring problem, altogether.
Thanks Jon,
ReplyDeleteI vaguely remember my son having the crank changed on his BMX bike. (I just put that on my list of future projects) Although I did not think it was "all that bad" using the old screwdriver and hammer to snug the lock ring.
But converting to a cartridge bottom bracket sounds like the way to go. Thanks again.
Cheers
I took a look at the Variable Pin Spanner Wrench you mentioned (Amazon.com), and it looks like it might be useful. As you wrote, it is similar to spanner wrenches supplied with angle grinders. I bought a Pin Spanner Wrench from Harris Cycle that I used to hold the BB cup in place while I tightened the lock-ring. It's ok for that application, but it's kind of flimsy, and would probably not suffice to tighten a lock-ring. It has round pins, not square ones.
ReplyDeleteI also looked at other conversion kits available on the market (Amazon.com). Other models do not have the protruding overhang, but are made of heavier gauge metal. One model is aluminum; I would pass on that one, in favor of one made of steel. With any conversion kit, I would guess that some consideration must be given to how the conversion kit might affect chain-line for the drive train.
Hey FujiPulsar88
ReplyDeleteSounds like you have the same type spanner tool that I have. (like tongs) Unless I start doing a boat-load of bottom bracket conversions (which is highly unlikely) I doubt I`ll purchase a wrench solely for that purpose.(I`m incredibly cheap)
About going with a steel conversion kit. That's fine but, One of the reasons people do the conversion in the first place, is to loose some weight. However I would also consider what the bike is going to be used for. If it were going to be used to haul newspapers everyday or something like that. Then steel would probably be the better choice.
The next time I do one of these I`ll look for the kit you described. I really like the idea of the lock-ring not being recessed.
Thanks for the good "food for thought".
Cheers