Hello and Welcome,
I found this Motobecane Nomade about 35 miles from here in my hometown of RoyalOak Mi. I paid considerably more than I normally would for this bike. However it is not that often I run across a mid 70`s Moto. in this condition.
Above: As nice is this bike is, it does have a few issues. Most notably the pedals are missing. Common these days, but not so in the mid 1970`s (at least not here). Also the front wheel has been replaced with a generic steel wheel. The rear derailleur has been up-graded to a Sun Tour Superbe Tech. I will be posting a link to an article about the Sun Tour Superbe Tech on the "Bicycle Related Links" list.
Above: The chain stay accounts for about 94% of the paint touch-up. In other words, the paint is in wonderful original condition. There is also a little paint touch-up to do around the seat tube collar (about 5%). The other 1% is in a few spots around the frame. "All in All" One of the cleanest mid 70`s frames I have seen in quite a while.
Above: As always I rebuilt the bottom bracket and took the crank/chain-rings apart. Each part "including the spacers" was cleaned and or polished. I like how the plating on the ring-guard was done to match the aluminum alloy chain-rings and arms.
Above: The bearings, cups and bracket are all in very good shape. I de greased everything and re-assembled it."after re-greasing of course" I did add a plastic protector or shroud to protect the bracket when I re-assembled the unit. I left the drive-side cup in place. To clean the drive-side cup, I just loosen the work-stand clamp on the frame (top tube) and tilt the frame a little. Then I can spray the Clean-Streak right inside the bracket housing holding the cleaning pot underneath to catch the drippings. Before screwing the left side cup into the shell I wrapped the threads with Teflon Tape. I thread the cup into the housing about 1/8 inch before I wrap the threads with the Teflon. It is just easier for me to do it that way.

Above: Before sliding the crank into place and tightening the retaining nut, I put a little blue "Thread-Lock" on the threads. I think the three piece crank looks really good. Looking at it now, I guess I should have installed a new dust-cap before taking the pic. I`ll try to remember that next time.
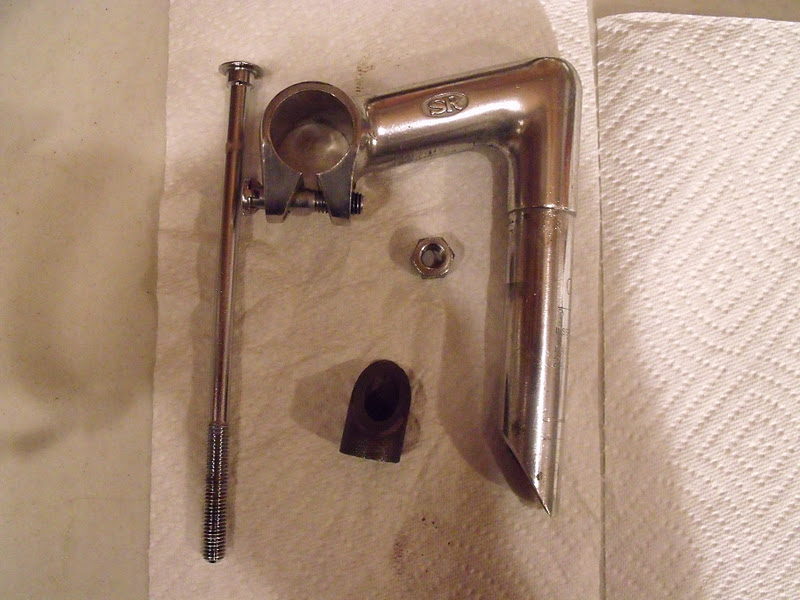
Above: Some of the bearing cups had stubborn grease rings after spraying them with Clean-Streak. To clean these and the crown-race I used the Mother`s Mag and Aluminum Polish. Note: I always lightly grease the "Steerer" Tube and lower Stem (below the insertion line) and wedge-nut before assembly.
Above: The Stem all polished-up with Mother`s. I used Turtle Wax Chrome-Polish / Rust Remover on the Stem bolt. There was also some light rust on the wedge-nut and lower stem-bolt. As well as some "rust-staining" on the lower stem. The fine brass "wheel brush" on the 18 volt rechargeable low-speed drill made quick work of that.
Above: As the wheel-set was miss-matched, I decided to replace them with this Araya wheel-set. The rear wheel has a Sun-Tour 5 speed free-wheel, which is a good match with the upgraded Sun-Tour rear derailleur. I am pleased that the Araya front wheel has a quick-release skewer. I will also replace the rear axle nuts with (M) nuts off the original rear axle. That should bring it all together nicely.
Above: Here is a shot of the rear wheel with the Sun-Tour Superbe Tech derailleur cleaned and mounted. As you can see I have also installed the new chain. I like to establish a basic drive train as soon as possible. The tires are PanaRacer Pasela Tour-Guards 27 x 1 (ISO 25-630) 115.0 psi. Yes, they are small and fast. And I got a fantastic deal on them as well.
Above: I had to include a close-up of this beautiful Superbe Tech derailleur. I bet they "snatched these up" in the early 1980`s when they hit the market.
Above: This is an older model of basically the same Huret derailleur that was on the bike. The original functioned fine but had some deep pitting on the chrome. So I cleaned-up this one (left-over from the Special-Sport build) and it works and looks fine. I almost installed an old Simplex, just because I like the mechanism. But I just could not "get past" the dull finish on the Simplex. Besides the Old Simplex makes an interesting knick-knack.

Above: The front brake, broke down and ready for cleaning and polishing. On all the alloy parts I used Mother`s. As for the chrome parts I used the Turtle-Wax. And for the plastic parts I used Simple Green (bio-degradable de greaser) The Mother`s also works well on the straddle cable. And all the nuts and bolts were cleaned-up with the brass wheel brush. As always, I did the calipers one at a time, using the other caliper for a reference. To wheel brush the nuts it is easier to brush them if you screw then onto a bolt. Keep the nut flush with the end of the bolt and the brush will do a better job.
Above: The front caliper all cleaned-up and re-mounted on the bike with a new set of jag-wire shoes. It is possible to clean-up calipers without breaking them down.
But to get them "as clean and shiny as possible" you really need to take them apart. Besides, There is "no better way" to learn how something works, than to take it apart and put it back together again. Even if you "get stuck" and have to go to your local bike shop for help, You will still learn. If you do have to go to the local bike shop, tell them you want to watch the assembly. Most techs and shop owners are happy to share their experience. If not, Go somewhere else! However, You should call ahead (ring them up). And ask "what would be the best time to come to the shop when you would have time to show me what I need to do". I know I would appreciate that. And be more likely to help that person out.
Above: The rear brake incorporates the rear reflector mount into the installation. This is a little trickier but no big deal. I am not happy with the pitting on the mount bracket. I will try to locate another chrome one in the shop. I`m sure there is one around here somewhere.
Above: I have cleaned-up these vintage English road pedals. I think they were on the old Team Raleigh Record. Who`s frame still hangs from the shop rafters, waiting for me to be inspired. I am considering using it for my track bike build. But I think the old girl deserves better than that. And there is another matching dust-cap on the way! A Special Thanks to John Fink for that.
Above: I have polished-up the original 25.5 seat-post. I was considering a micro adjust post. But the only one I could find was anodized orange with a sleeve. So for now I`m going with the original. I am also going with the original handlebars.
They are in good shape and cleaned-up real good. I also polished-up the original levers and cleaned the black hoods. When finished she will have black hoods and black cork infused thick handlebar tape. And all black cable housings and a sleek black racing saddle. And all new jag-wire cables as well.
Above: The Simplex shifters. In a perfect world I would install Sun-Tour shifters and a Sun-Tour front derailleur to complete my Sun-Tour drive-train. But as I paid too much for this bike going in, I have to be realistic. But I will say this, I do like the Simplex "adjust on the fly" shifters. Who knows? maybe I`ll run across another donor bike. Well that`s about all I have for now. The saddle has been shipped by Jenson USA. I ordered this saddle Sunday night and received my item has been shipped e-mail Monday! You can`t beat that with a stick! So Thanks to JENSON USA! Well done! I should have "The Nomade finished" post up by early next week, if not sooner.
And I have come-up with a simple technique that I think might make cork handlebar tape finishing (cutting and taping) easier for the beginner. So watch for that on my next post.
Until Next Time, Ride Safe and Remember to Always... RESCUE, RESTORE & RECYCLE
Cheers,Hugh