
Above: At this point I have already cleaned up the bike using about a half dozen Armor All Cleaning Wipes. I have also installed a salvaged seat post and saddle. The list of problems with this bike is long, so I won`t try to list them I will just talk about them as I go.

Above: The 26 inch mtb front wheel. The hub was very loose, (cones way out of adjustment) the tire was almost flat and the wheel needs some truing. The good news is! I pumped up the tires and they appear to be holding air. I was amazed to find grease on the bearings. And the grease did not have those hard specks I found in the grease on the New Thruster fixed gear bike. I should also mention that I inspected the tires very closely. They are still very pliable and don`t even show a hint of cracking. Also I did replace the cable housings that felt sticky do to rust. And both of the cables I took from the parts bike look like new. I did add a few drops of clear oil to the cable housings as well.

Above: After cleaning up the hub parts with White Lightning Clean Streak I regreased and reassembled it with the cones set properly (no grind/no play).

Above: I also cleaned up the hub inside and out. It now spins nicely and for quite a while. The truing needed is not that bad. I will true the wheels latter on without removing the tires. Or removing the wheels from the bike for that matter. On an entry level cruiser or mountain bike the using the wheel truing stand is not necessary.

Above: While the parts bike does look like a total p.o.s. it did prove to be invaluable before this overhaul was finished. I might add the 26 inch mtb tires and pedals on the parts bike show no wear at all. You know instead of going to the department store and paying 150.00 for a bike and then leaving it out in the yard to rust. Maybe this fool should have driven to a homeless shelter and given them 75.00 Then they would still have 75.00 and could have felt good about have done something positive for another human being. I do not mean to preach but being this wasteful is just wrong. Especially when so many are trying to get by with so little.

Above: Shown is the yellow front linear brake I salvaged from the parts bike. The original front linear brake, noodle and rubber boot were damaged. And miraculously these same parts were all in good condition on the parts bike. After some "fah nagle ing" I got the replacement front brake working pretty well. After I true the wheel I will be able to set it even tighter.

Above: I was able to regrease the headset bearings without completely removing the front end. Look closely and you can see my 1947 Western Flyer "fixed gear trike" propping up the suspension fork while I carefully wipe and re grease the lower headset bearings. I hung the handlebars and stem from the frame while doing this. I also brushed some rust off the wedge nut (stem) and smeared a little grease on it before reassembling the threaded headset /front end.

Above: The rear hub was also sloppy. Fortunately I did have the correct tool for removing the freewheel. After de greasing the axle, cones and bearings I started to reassemble the rear hub. It was at this point I noticed the rear axle was bent. This is a real kick in the a$$ because I really felt like I was making good progress. I removed the axle assembly from the parts bike and cleaned it up using White Lightning Clean streak. After matching them up I went ahead and greased the bearings and cups and reassembled the rear hub. It fit perfectly (even the spacers matched) and it is spinning real smoothly. I also cleaned and lubed the 7 speed freewheel and cleaned up the pie plate.

Above: I sprayed some WD-40 on the rusty rear derailleur springs and hinge points and wiped it off. Then I removed some slack from the cable and it is now shifting fine. I will spray some Tri-Flo on the rear D and sprocket group before I test ride it. I also sprayed some WD-40 on the rusty chain (in sections) and wiped it clean. I will put some chain lube on the chain before I ride it. I might mention, contrary what many people think.. WD40 is not a lubricant. But it is great at breaking down rust and loosening up rusty components.

Above: The Falcon front derailleur was froze up and the cable was badly frayed at the anchor point. I checked the Twist Grip Shifter and shift cable on the parts bike and they looked surprisingly good. So I carefully removed those and swapped them out with the originals on the Rhino. I found this Shimano front derailleur in my collection of salvaged front derailleurs. It seems to be straining to shift onto the largest chain ring. If this does not improve after lubrication and adjustment I will install a different front derailleur.
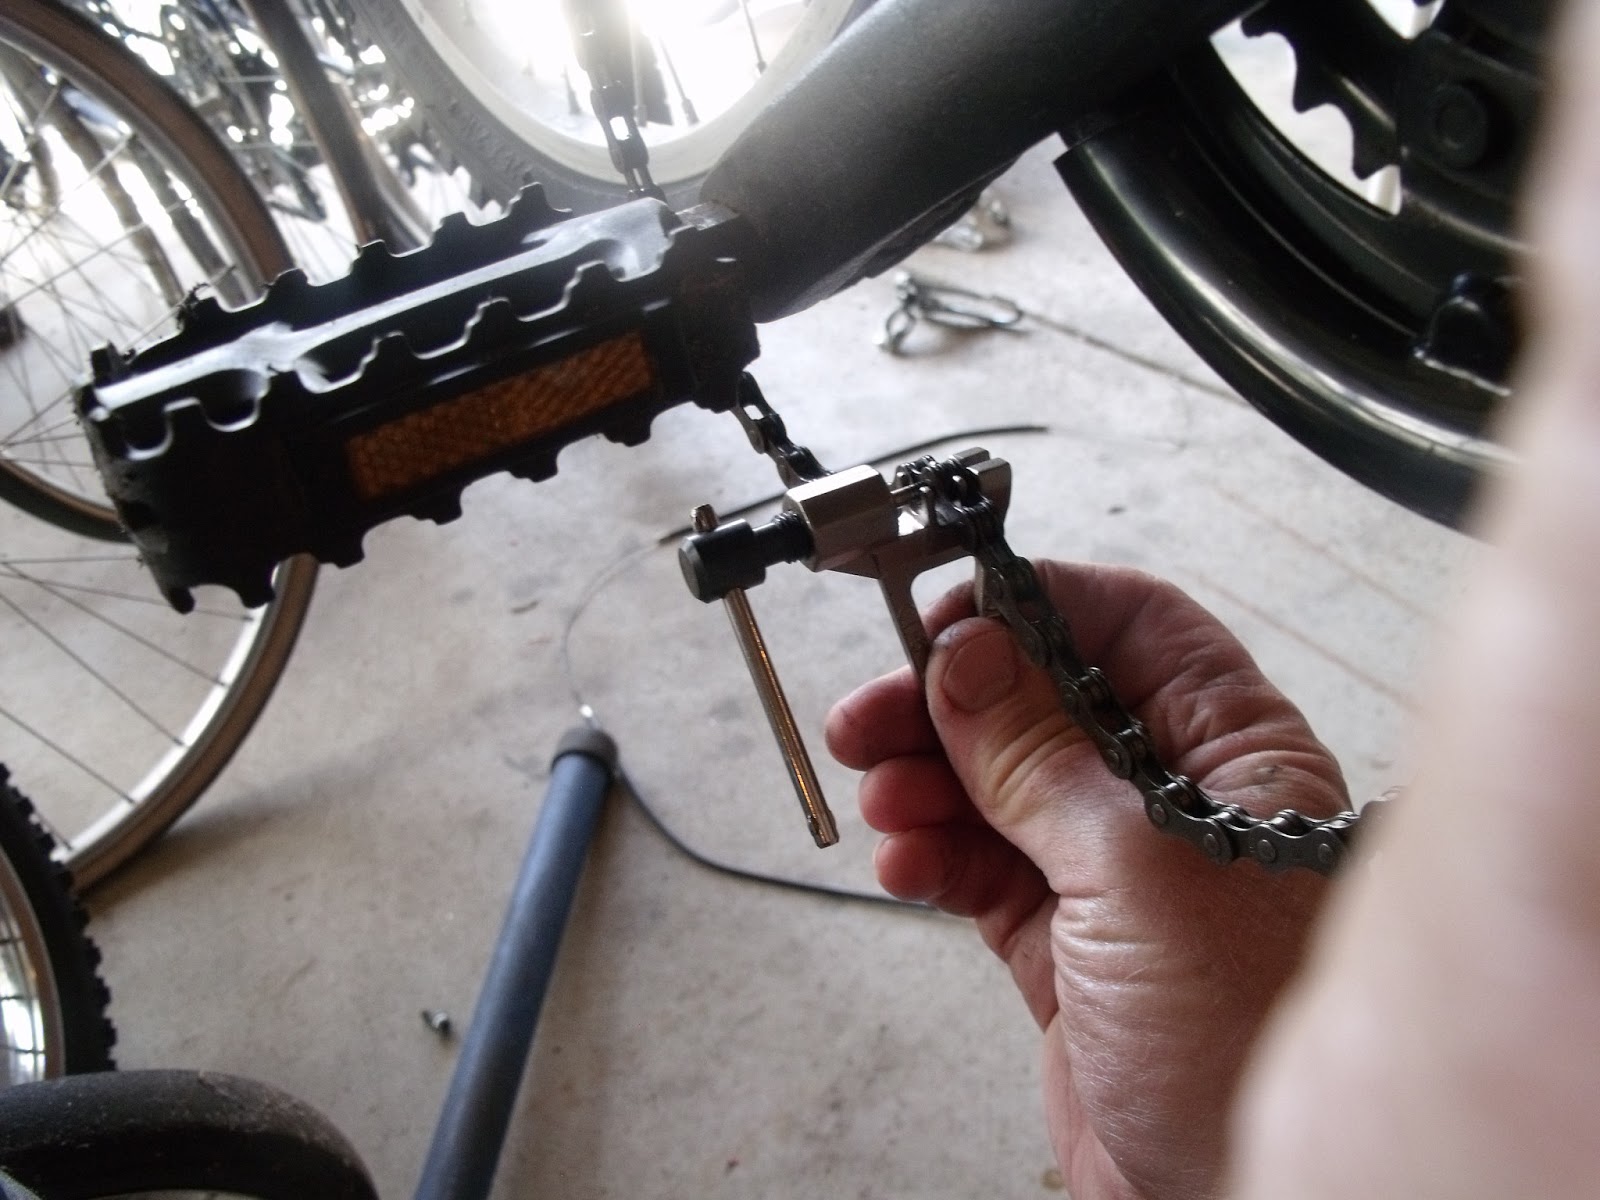
Above: Because the chain guide on the Falcon front derailleur was not removable I had to break down or open the chain to remove it. The little Park CT 5 Chain Tool is still working like a champ! Here I am finishing pressing the pin back into the chain. I am always careful to not remove the pin completely, this saves me a lot of aggravation. When using the tool to open the chain I always press the pin out towards me. This makes it much easier to press the pin back into place.

Above: QUICK TIP... I use a Velcro strap to hold the derailleur in position to give me slack while using the chain tool.

Above: Here I have removed the three piece crank and bottom bracket assembly. Earlier in the day I noticed the dust cap on the left side crank arm was missing and the nut looked real rusty. So I sprayed it "in advance" with a little WD 40. It worked great as the nut came off easily using a 6 point 14 mm socket. I have mentioned this before so I will again.. When removing the retainer nut or bolt for the crank or crank arm use a socket that matches the nut or bolt head. It it is six sided make sure your socket is as well. These nuts and bolt heads are shallow and are not always the best quality of hardened steel. This will greatly lessen your chances of rounding off the nut or bolt head.

Above: Here I am ready to spray the bottom bracket spline and bearings as well as the left side cup. This is a rush job (that don`t pay $hit) so there is no time for the Ultrasonic parts cleaner. As usual I have lined the pot with dirty paper towels and placed the strainer in the pot. This is a very inexpensive and effective way to clean parts. Just don`t use Mom's strainer and pot! As always I will be spraying them with White Lightning Clean Streak.

Above: Here the bottom bracket is reassembled. I want to repaint the left side crank arm with Rust Oleum flat black before reassembly. Which I am going to do right after I finish here. The easy adjust seat post collar clamp is also from my collection of salvaged parts. This work was done yesterday Saturday, it is now Sunday. If I paint now I can finish the bike and this post tomorrow. See you tomorrow! Sorry the mixtie project was delayed for this and other repair work. I will hopefully get that going again Tuesday or Wednesday.

Above: It is now Sunday evening. I forgot how fast flat black paint dries. The bike is finished! I took it for a short ride (3 miles) and it performed really well "for what it is". I have been spoiled riding my DiamondBack Overdrive 29er. This bike felt like a lot more work to get where I was going.

Above: Looking pretty sweet considering that "so far" I have only used salvaged and reconditioned components from the parts bike and my own stock. I say "so far" because I will probably be installing a new multi speed chain tomorrow. Other than that, I only have some cosmetic detail work (cleaning and rust removal) to do.

Above: I was amazed riding the bike by how smooth the bike felt. I think being a department store bike I expected it to feel more clunky. Also it did not jump gears at all. And the chain never slipped on the sprocket group in any gear. Also I was pleasantly surprised by how well the brakes worked. For liability reasons I made sure that the reflectors were remounted correctly. I have no idea if this fellow is going to be riding in the dark.

Above: I have not yet had a chance to take the L.L. Bean bike out for a real good ride. Maybe I will do that tomorrow morning :) That is about all I have for now. Until next time Please RIDE SAFELY and Remember to Always..RESCUE, RESTORE & RECYCLE
Cheers, Hugh

A Special THANK YOU to those of you have been checking out Hugh's Online Bike Shop. You probably noticed that I am now adding word links to components, tools and supplies ect. ect. that I mention in my blog posts. Like the Store these links are powered by amazon.com . I am doing this to make it more convenient to purchase things that interest you on the blog. Also if you are new to bicycle work, and you are not sure what I am talking about? You can click on the word link just to see some examples of what I am referring to. I look at this as a positive change and I hope you do too.
Thanks, Hugh


Hugh that Outcast never had it so good as to be in your skillful hands. You got some good Karma banked on this job. Thank goodness for POS parts bikes and a well stocked parts bin ;-)
ReplyDeleteHope you get out on your spiffy LL Bean soon. Looking forward to Mixte Part II
RR
Nice job. Love those department store bikes, so inexpensive. Gotta appreciate the parts bike having so many common components too. =)
ReplyDeleteThanks Hugh. Looking forward to more on the Mixte project.In the meantime, get out for a nice ride. You deserve it.
ReplyDeleteIt was one of the stunning moments of my life when I learned, just a year or so ago, that Water Displacement iteration 40 was not a lubricant. I mean, it was for the previous half century of my life, or so I (and everyone I knew) thought; we used it for everything. And it seemed to work, I guess, or maybe it was an illusion...
ReplyDeleteNice work on the MTB. Do you get a sense it will last? My experience last year was that for any kind of longevity I would have to replace EVERYTHING sooner or later and that just didn't sound like the way to go.
Your mini-rant was right-on and here in the Land of the Homeless I see those bikes everywhere I go...in ditches, under bushes, chained to bus stops in semi cannibalized form...it sanddens me and what makes it even worse is You-Know-Who is making millions by retailing these bicycles that may or may not get you across town right out of the (big) box.
I have friends who refuse to ride a "skinny-tired bike" like mine and they think they got it made schlepping around town on those slow, decrepit old MTB wannabes and I gave up proselytising on the subject a while back.
The friend of your friend probably doesn't know how lucky he was having his bike find its way to you.
Like having Michelangelo paint your house.
tj
"Michelangelo paint your house."
ReplyDeletePerfect.
I have no idea how to respond to that comment except for to say Thank You
DeleteHugh, I could really use some advice. I was thinking of buying a bike. It is a "EDOARDO BIANCHI" the model number is 70184919, the parts say "sogino vp" on them and it says "infinity cr-mo tapered double butted tubing tange" on the tube. Can you tell me anything about the bike? Is it worth 1.5hr drive and $60 bucks?
ReplyDeleteMicaiah,
DeleteSorry this took so long. We have been overwhelmed with all the remodeling and repair work going on here lately. Other than knowing BIANCHI is a very popular bike. And they they demand top dollar on Craig's list, I really have no experience with them. I would inquire on bike forums and old ten speed gallery. Sorry I could not be more helpful.
Cheers, Hugh
P.S. I don't know about the drive. But the 60 dollars sounds great.
how do I repair the speed control of my power shifting 21 speed aluminum outcast Rhino made in china
ReplyDeleteWhat size is the seatpost?
ReplyDelete