Hello and Welcome,
I am feeling much better since throwing my back out Christmas day (evening). I am back in training as well. Today (Jan 7th) was my first real day back working in the shop. I did manage to do a little bike hunting earlier in the week which resulted in me purchasing yet another
unicycle. It looks almost exactly like the Landis I sold, except it is a 24in wheel size and has a different saddle. I believe I left off with the rear derailleur on the Mt Jam, so we`ll pick up the over-haul / detail-job there.
Above: The
Shimano SIS rear derailleur cleaned-up nicely and looks good re-mounted on the bike. For now I am leaving the derailleur guard off. I did not replace the derailleur cables as they look like they had been replaced recently. I did trim the end of the cable and install a new crimp-on (cable end). I really want to avoid messing with the grip-shift type shifters if possible, so far so good.
Above: The
front derailleur which is mounted on the cartridge type or
sealed bottom bracket assembly. I removed the crank for cleaning and to get a good and first look at this type of front derailleur mount. This generated a little bit of chatter on the face-book page as I suspected it would. Thanks to John Fink and others who commented on the unusual front derailleur mounting system. As I suspected it locks the height in when this mount is used. The drawbacks are, there is no height adjustment. Which would really limit your chain-ring size options that you could use with this set-up. Also it looks rather bulky and is probably heavier than a typical clamp or braze-on mount. But it is interesting none the less. And it does have it`s advantages as well. For instance, No guessing at the derailleur height. And I would think it is very sturdy as well, No small thing on a
mountain bike.
Above: Being this is a cartridge type bottom bracket that is still very smooth, there is no point in taking all this apart. So I`ll attempt to clean-up the derailleur and outer bottom-bracket on the frame. I place a drip catch beneath the bracket and derailleur. Now I spray the derailleur and bracket with
White Lightning Clean Streak. Before it has a chance to dry I brush it with the parts brush and re-spray. It was necessary to repeat this a few times to get it really clean. And I keep the spraying to a minimum and try to keep my distance as much as I can to avoid inhaling the fumes. I will spray a light coat of
Tri Flo Lubricant on both derailleurs latter on.(out side)
Above: The chain-rings appear to be riveted together with rivets that look like inset screws. It`s not "all that dirty". So I will spray the chain-rings and polish the arms with
Mother`s Mag and Aluminum Polish. I have some nice take-offs I can use for pedals. As the originals are very small.
Above: Here is the
triple crank set or chain-rings and arms all cleaned and polished. All I need to do at this point is re-mount the clear bash guard. I cleaned the
bash guard with the Simple-Green biodegradable de greaser.
Above: Here is a better shot of the front derailleur mount that attaches to the bottom-bracket assembly. What appears to be a collar-clamp is actually a brace. I am guessing this is to give it more strength or rigidity when cable pressure is applied during shifting. Now I think it`s time to move on to the the
24 inch front wheel.
Above: The front wheel-hub, spokes and rim all cleaned using only
Armor All Cleaning Wipes. I even used them to clean the outer spacer/cones on the axle.
The front hub (cones) was set a bit too tight. So after checking the grease, I re-set it a little looser. (no grind, but no play as well) As my friend Mike A taught me so many years ago, Tighten the cones until you feel the slightest grind then back-off the cone nut about an 1/8" then check.
Above: Here I am using the
wheel truing stand to service the front wheel. This wheel had about 1/8" of wobble in three or four spots around the rim. I trued the wheel down to a 1/16" or less wobble at any point around the wheel.
These were all very slight adjustments to the spokes. I don`t think I turned any spoke more than about an 1/8th. If the wheel does not re-act when you tighten a spoke an 1/8th (for slight wobble) and if the spokes feel tight on both sides. Try loosening the spoke on the same side that the rim is rubbing the pin about an 1/8th". Truing wheels is something you can practice on any old wheels you may have laying around.
Above: Unlike the
derailleur cables, the brake-cables were in rough shape. Here you can see where the cable has frayed at the clamp or anchor point. This tells me they have been adjusted one to many times and need to be replaced. Quick Tip* To remove this frayed cable, pull back the rubber boot and cut the cable on the inside of the clamp or anchor. Frayed or not, I always cut a
brake cable here that I know I am going to replace. This just speeds up the process of removing the wheel and the cable at the "lever end" of the cable. Obviously you do not want to do this if you plan to re-use the cable.
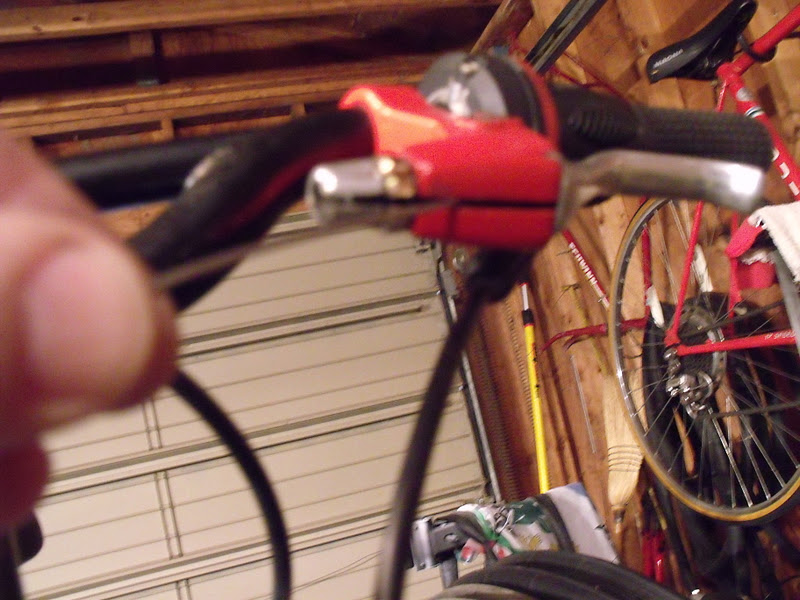
Above: Here I am removing the cable at the lever end. You can see I have loosened the
barrel adjuster and aligned the grooves or slots so I can slide the cable out. To remove this type cable you will need to open or squeeze the lever exposing the harness that holds the barrel shaped cable end. You just aline the cable with the slot in the harness and then you can work the cable free.
Above: Despite the blur, If you look closely you can see the slot just to the right of the cable. Once I swing the cable (right) over to the slot I can now easily work the barrel shaped cable end out of the harness. Another Tip. When you replace the cable (starting at the lever end of course) Make sure you have the barrel adjuster screwed in all the way and that the slots no longer line up. Also if you have
reach adjustable brake levers and you want to adjust the levers inward (for smaller hands) do this now. If you do it afterwards you will need to loosen the anchor or cable clamp and re-adjust. Also make sure all your cable ends are in the cable guides before tightening the anchor clamp. If you miss one of these,you will have to loosen and re-adjust the cable to fix it.
Above: You always want to add a drop or two of
cable lubricant (inside) before you insert the cable into the housings. I like to use (Polaris) snowmobile "cable and clutch lubricant" because I live in a colder climate. I use one drop in the short housings and two in the longer ones. Same goes for derailleur cable housings as well.
Above: The original
Velo Saddle was split along the bottom edge on both sides. I decided to replace it with a Ze'Fal Saddle. This way the new owner or I can add a clip on Ze'Fal under-seat bag for a mere 9.99 US. The original saddle was quite small. But being we are the "fattest country in the world" I am not at all concerned about the replacement saddle being much larger.
Above: The finished project. I did clean the original chain and it looks really good. I used
Park Citrus Chain Cleaner and it did a wonderful job. I also re-used the
micro adjust seat post, after removing the scratched-up black paint finish. The pedals are some slightly used Well-Go resin take offs.
Above: Here is a shot of that rear brake all hooked-up and ready for action. When I attach the brake cable, I just close the brake all the way by hand. Then let it open just a little. Then I give it a spin, and if it does not rub I just tightened the cable anchor (clamp) up and she`s "good to go".
above: A shot of the rear derailleur, wheel,
7 speed freewheel and chain. Notice how new the derailleur cable looks. Trimming the end of the cable allowed me to disconnect it so I could lube all the derailleur cable housings as well. I did not want to assume that who ever replaced the cables, lubed the housings.
Above: A shot of the crank assembly and front derailleur. All that is left to do is the paint touch-up and lubing the chain. The derailleurs were lubricated with Tri-Flo just before these pics were taken.
Above: A shot of the handlebars and twist grip type shifters.
Above: A shot of the front brake. I love these tires, not too aggressive but a fairly smooth ride on paved surfaces. A true on/off road tire. Viva Le Bontrager!
Above: The port side. A nasty looking scratch on the head and upper down-tube. I will start the paint touch-up tomorrow. These pics were taken Jan 7th. I have never seen it this warm for this long in January. Kind of worrisome.
Above: Back on the stand for touch-up and final adjustments. UPDATE: I did eventually replace the cheap kick stand with a Greenfield alloy stand. And also finished the paint touch up as well.
I hope everyone had a wonderful Holiday Season. My back is feeling 100% better and I am back on my stationary bike and doing a "light weight" upper body workout and doing bunches of mini crunches. Thanks for all the well wishes. They really helped me get motivated!
Until next time, Please Ride Safe and Remember to Always RESCUE, RESTORE & RECYCLE
Cheers, Hugh